Warung Bebas
Tampilkan postingan dengan label Microsoft Windows Xp. Tampilkan semua postingan

Senin, 04 Maret 2013

Pop A Banner Each Time Windows Boots


-: Pop A Banner Each Time Windows Boots :-


To pop a banner which can contain any message you want to display just before a user is going to log on.

Go to the key :- HKEY_LOCAL_MACHINE\SOFTWARE\Microsoft\Windows\CurrentVersion\WinLogon
Now create a new string Value in the right pane named 'LegalNoticeCaption' and enter the value that you want to see in the MenuBar.

Now create yet another new string value and name it:
'LegalNoticeText'.
Modify it and insert the message you want to display each time Windows boots.

This can be effectively used to display the company's private policy each time the user logs on to his NT box.

It's '.reg' file would be:
REGEDIT4 [HKEY_LOCAL_MACHINE\SOFTWARE\Microsoft\Windows\CurrentVersion\Winlogon] "LegalNoticeCaption"="Caption here."

Categories: None

Selasa, 08 Januari 2013

Recover "Show Desktop" Icon

Recover "Show Desktop" Icon


Yesterday I have accidentally deleted ‘show desktop icons’ button on my quick launch bar. However I was able to recover the icon using the following commands.

Go to Start>>Run and type the following command and press enter.
regsvr32 /n /i:U shell32.dll


A Pop-Up should appear as below.

Now you can see your icon on the quick launch hidden icons as shown below which you can drag and drop on Taskbar.

Most of the cases the above trick should work. If not then you can create your own script using Notepad
.
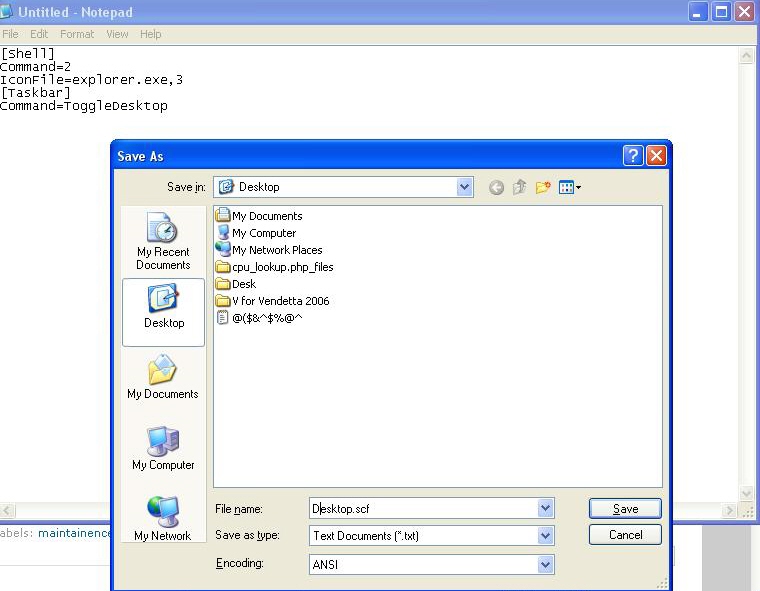
1.       Open Note Pad and paste the following.
[Shell]
Command=2
IconFile=explorer.exe,3
[Taskbar]
Command=ToggleDesktop

2.       Save the text file as ‘Desktop.scf’


3.       You can see the missing icon at your save place, Drag the icon to quick launch bar and Done..

If you find any difficulty in the above process you can just remember the shortcuts.

Show Desktop -  Win+D 

Delete Recycle Bin Icon in Windows XP

Delete Recycle Bin in XP


Have you ever tried to freak out your friends! Well here is a trick that makes your buddy to go wild.

Recycle Bin is one of the most common used icon on pc, why I’m mentioning this only because other icons like My Computer, My Documents can be deleted and restored. But you can’t do neither to Recycle Bin in XP.

However you can delete it using ‘regestry’ just follow the following steps.

·         Open Run>>Type ‘regedit’ and Exter

·         Navigate through the following (Taking Registry Back Up is compulsory)
HKEY_LOCAL_MACHINE\SOFTWARE\Microsoft\Windows\CurrentVersion\Explorer\Desktop\NameSpace\Delete {645FF040-5081-101B-9F08-00AA002F954E

·         Close Registry and restart and you wont find your Recycles Bin.

Note:  To recover the same you can either import the registry back up or create the same key at the registry.

Rabu, 24 Oktober 2012

8 Registry Hacks to Tweak Your Windows PC

8 Registry Hacks to Tweak Your Windows PC


Registry Hacks to Tweak WindowsMicrosoft Windows offers a feature-rich interface and several customization options that make it one of the most user friendly operating systems in the world. However, computer geeks would still love to hack the Windows Registry so as to add more extra features and functionalities to their operating system.
If you’re one such geek who would like to customize Windows in your own way, here is a list of 8 interesting registry hacks that you need to try:

1. Disable USB Devices:

Disabling USB ports can be a smart idea to add security to the computer. This can be really handy if the computer is on a public place where the chances of virus and other malware infection is really high. You can easily disable access to USB ports with the following registry hack:
  1. Open the Registry Editor (Start -> Run -> Type regedit and hit Enter)
  2. In the registry, navigate to the following key:
    HKEY_LOCAL_MACHINE\SYSTEM\CurrentControlSet\Services\UsbStor
  3. In the right-side pane, double-click on “Start”.
  4. In the “Value data” field enter 4 and click on “OK”.
  5. Close the Registry Editor and reboot.
To enable USB devices, follow the same procedure as above except in the step-4 enter 3 in the “Value data” field.
Works on Windows XP, Vista and 7.

2. Disable Notification Balloons in Windows 7 and Vista:

You can now disable the annoying notification balloons that keeps popping up frequently with warning messages and reminders. Here is a step-by-step procedure to do that:
  1. Open the Registry Editor and navigate to the following key:
    HKEY_CURRENT_USER\Software\Microsoft\Windows\CurrentVersion\Explorer\Advanced
  2. Right-click on the right-hand pane, and create a new “DWORD”.
  3. Rename it to EnableBalloonTips, double-click on it and set the “Value data” to 0. Reboot the computer to see the changes in effect.

3. Add “Recycle Bin” to My Computer in Windows 7 and Vista:

Would you like to add the “Recycle Bin” icon to My Computer so that you need not go back to the desktop to access it when required? Well, here is how you can do that:
  1. Open the Registry Editor and navigate to the following key:
    HKEY_LOCAL_MACHINE\SOFTWARE\Microsoft\Windows\CurrentVersion\Explorer\MyComputer\ NameSpace
  2. Right-click on “NameSpace” and select New -> Key. Name the key with the following name:
    {645FF040-5081-101B-9F08-00AA002F954E}
  3. Now, open “My Computer” and hit F5 to refresh the screen. This should show up the “Recycle Bin” icon.

4. Disable the Windows Task Manager:

Need to limit access to your computer by disabling the Task Manager? Here is a simple registry hack to do this:
  1. Open the Registry Editor and navigate to the following key:
    HKEY_CURRENT_USER\Software\Microsoft\Windows\CurrentVersion\Policies
  2. Right-click on “Policies”, select New -> Key and name the key as System.
    If you are on Windows XP, you need not create the new key “System” as it is already present in it. So, you can directly navigate to: HKEY_CURRENT_USER\Software\Microsoft\ Windows\CurrentVersion\Policies\System in the Step-1 itself.
  3. Right-click on “System”, create a new “DWORD” and name it to DisableTaskMgr.
  4. Double-click on the DWORD “DisableTaskMgr” and set the “Value data” to 1 (0=Enable, 1=Disable).
  5. To enable the Task Manager, Set the “Value data” back to 0.
Works on Windows XP, Vista and 7.

5. Change the Registered Owner and Organization Name:

Here is a simple hack to change the name of the Registered owner on your computer:
  1. Open the Registry Editor and navigate to:
    HKEY_LOCAL_MACHINE\SOFTWARE\Microsoft\Windows NT\CurrentVersion
  2. On the right-side pane, find the keys RegisteredOwner and RegisteredOrganization. Double-click on them to change the names to whatever you want.
  3. To see the changes, right-click on “My Computer” and select “Properties”.
Works on Windows XP, Vista and 7.

6. Add Programs to Windows Startup:

You can now add your favorite programs to Windows Startup without the need for using the start-up folder. Here is a way to do this:
  1. Open the Registry Editor and navigate to the following key:
    HKEY_CURRENT_USER\Software\Microsoft\Windows\CurrentVersion\Run
  2. On the right-side pane, create a new “String Value” and rename it to the name of the program that you want to add (you can give any name, it doesn’t matter).
  3. Double-click on the “String Value”, in the “Value data” field add the path of the executable program that has to execute at startup.
  4. Reboot the computer to see the changes in effect.
Works on Windows XP, Vista and 7.

7. Add “Pin to Start Menu” Option for Folders in Windows 7 and Vista:

Ever wanted to pin a folder to the start menu to gain faster access to it? Well, it is possible to add the “Pin to Start Menu” option so that you can plug your favorite folders to Start Menu. Here is a step-by-step procedure:
  1. Open the Registry Editor and navigate to:
    HKEY_CLASSES_ROOT\Folder\shellex\ContextMenuHandlers
  2. Right-click on “ContextMenuHandlers” and select New -> Key. Name the key as follows:
    {a2a9545d-a0c2-42b4-9708-a0b2badd77c8}
  3. Now, whenever you want to add a folder to Start Menu, hold down the Shift key and right-click on the folder. You should see the “Pin to Start Menu” option in the context menu”.

8. Disable “Aero Shake” in Windows 7:

One of the new additions to Windows 7 is the “Aero Shake” feature using which it is possible to grab a window using it’s title bar and shake it. This will minimize all the other open windows if any. It is really a handy feature! However, if you ever wanted to disable this feature, here is a solution:
  1. Open the Registry Editor and navigate to the following key:
    HKEY_CURRENT_USER\Software\Policies\Microsoft\Windows
  2. Now, right-click on “Windows” key and create a new Key called Explorer.
  3. Right-click on the “Explorer” key and create a new “DWORD” called NoWindowMinimizingShortcuts and set it’s value to 1.
  4. Close the Registry Editor and reboot the computer to see the changes in effect.
I hope you enjoyed this post. Try the hacks and share your experiences.

Kamis, 11 Oktober 2012

Taking a screenshot on a Windows PC


Taking a screenshot on a Windows PC is easy. Taking a screenshot (also called a screen grab, or print screen) can be done in one of several ways. Try any of the techniques listed below.

Steps

Snipping Tool Method

The Snipping Tool method works with Windows 7 Home Premium, Professional and Ultimate, and with Windows Vista editions except Starter and Home Basic. For other versions of Windows, use the Print Screen method described below. For a more detailed tutorial on using the Snipping tool, see How to Take a Screenshot with the Snipping Tool.
  1. 1
    Open the Snipping Tool. The Snipping Tool is found in Start/All Programs/Accessories/Snipping Tool.


    • The Snipping Tool is only found in Windows 7 Home Premium, Professional, and Ultimate, and in all Windows Vista versions except Starter and Home Basic. If you don't have the snipping tool, use the Print Screen method instead.
  2. 2
    Choose the kind of screenshot (snip) you would like to take. "Rectangular Snip" is chosen by default.


    • "Free-form Snip" lets you draw an area of any shape. Only the area you drew will be snipped.
    • "Rectangular Snip" lets you select a rectangular area, which will be snipped.
    • "Window Snip" lets you choose a window to snip.
    • "Full-screen Snip" snips the whole screen, with all windows (except the Snipping Tool window) included.
  3. 3
    Select the area that you want a screenshot of. If you chose "Window Snip", select a window instead. If you chose "Full-Screen Snip", go to the next step.


  4. 4
    Save the screenshot by clicking the floppy disk icon in the window that pops up. Type in a name for the screenshot and change the "Save as type:" field if desired. Read the "Tips" section for information on file types. You can now send the screenshot by email or put it on a website.

    Posted By: Gautham Haridas, via http://wiki-trickz.blogspot.com

Kamis, 26 Juli 2012

Useless System Services That Can Be Turned Off

Disable system services for maximum performance :
There are system services that you can disable to free up the system's load. To access the interface that permits you to make changes to system's services, type services.msc and the command prompt.
This is a list of services that are *usually* useless and can be safely disabled.
  • Alerter
  • Application Layer Gateway Service,
  • Application Management
  • Automatic Updates
  • Background Intelligent Transfer
  • Clipbook
  • Distributed Link Tracking Client
  • Distributed Transaction Coordinater
  • Error Reporting Service
  • Fast User Switching Compatibility
  • IMAPI CD-Burning
  • Indexing Service
  • IPSEC Services
  • Messenger
  • Net Logon
  • Net Meeting
  • Remote Desktop Sharing
  • Network DDE
  • Network DDE DSDM
  • Portable Media Serial Number
  • Remote Desktop Help Session Manager
  • Remote Registry
  • Secondary Logon
  • Smartcard
  • SSDP Discovery Service
  • Uninterruptible Power Supply
  • Universal Plug and Play Device Host
  • Upload Manager
  • Webclient
  • Wireless Zero Configuration
  • WMI Performance Adaptor
NOTE: Make sure you don't need them since some applications you're using could depend on them. If you make any application to fail by disabling any of the services, go back and enable it again.

How To Remove Hidden Softwares

Edit sysoc.inf to list all software

To show all software that can be removed from your computer (including protected Windows services), you can manually edit (using notepad for example) the sysoc.inf file located in Windows\inf\. Just remove the word hide next to the software pack.

Note - use this at your own risk. Removing critical components of the system will make Windows unstable.

Sabtu, 21 Juli 2012

Enable Task Manager disabled by Administrator or Virus in Windows

enable task manager disabled by administrator


 Registry Editor is an inbuilt Windows tool that is used to modify registry keys which tell Windows how it should work. A simple registry modification can be used to bypass the Task Manager block. To do so, just follow the 


  steps:-

  1. Click on Start. Go to Run. If you use Windows 7 or Windows Vista, go to Search.
  2. Type regedit and press Enter. Registry Editor will start. If Registry Editor is also disabled, you will first need to enable registry editing.
  3. Through the left hand navigation pane, navigate to HKEY_CURRENT_USER\Software\Microsoft\ Windows\ Current Version\Policies\System.
  4. In the work area, double click on "Disable TaskMgr". A window will pop up.
  5. Enter its value data as 0 and press OK.
  6. Close Registry Editor. If Task Manager is still disabled, restart your computer.
                                                               OR 


Create a Registry(.reg) file for enabling Task Manager

If you are unfamiliar with manually editing the Registry, you can create a Registry file which will automatically modify the Registry Key to re-enable Task Managing. To create one such file:-
  1. Open Notepad or any other text editor.
  2. Copy the code given below and paste it as it is in it.
  3. Windows Registry Editor Version 5.00 [HKEY_CURRENT_USER\Software\Microsoft\Windows\ CurrentVersion\Policies\System] “DisableTaskMgr”  =dword:00000000
  4. Save the file as Enable Task Manager.reg or *.reg.
  5. Open the file by double clicking on it.
  6. Registry Editor will ask you for confirmation. In the confirmation Window, click Yes.
  7. Task Manager would immediately be accessible. If it is not, restart your computer.


Minggu, 05 Februari 2012

How to Update Windows OS Without Internet Connection...

How to Update Windows OS Without Internet Connection

How to Update Windows OS Without Internet Connection Microsoft frequently releases Security and other essential updates for windows.These updates fix newly discovered bugs and flaws and increases efficeny and protection of Windows.If you don’t have internet connection or have slow internet then you can’t get the updates directly from microsft instead you have to use a third party utlity called Autopatcher.
AutoPacher allows you to download for your windows Operating system and saves it for offline installation.This gives you the liberty to update any computer without internet connection.

How to Update Windows OS Without Internet Connection:

  • Carry your Pen Drive and Go to your nearby Cyber Cafe then download Autopatcher software from here.
  • After downloading this software just install and run it.
  • It will prompt you to select the OS for which you want to download the updates and click on Next button.
  • Now Select your OS whether it is 32-bit or 64-bit supported. If it is 32-bit then select X86 otherwise select X64 and click on Next button.
  • A list of all updates for your OS will be shown.
  • Select all the Updates and click on Download button.
  • After finishing the download just copy/paste all the downloaded updates in your Pen Drive.
  • Now insert this Pendrive into your system for which you have downloaded all these updates and install them.
That’s it! This is the best method to install the updates in Offline mode and secure your PC. This works for all windows OS (Window 7/Vista/XP).

Rabu, 25 Januari 2012

How TO Make Your Windows XP Genuine!!!

You have a copy of Windows XP which several times pop up message about its activation, you don't have internet connection to activate your XP. So here's the trick that can help you get rid of this problem. Please note that this trick will only work on ordinary Windows XP SP1-SP2 installation that too before installing any other program on it i.e
your installation must be fresh to make this trick work out. Also it will not work on OEM version of Windows XP so if this trick doesn't work for you check your copy for OEM.

Method 1:
Open Notepad and copy following lines in it,


Windows Registry Editor Version 5.00
[HKEY_LOCAL_MACHINESOFTWAREMicrosoftWindows NTCurrentVersion]
“CurrentBuild”=”1.511.1 () (Obsolete data – do not use)”
“ProductId”=”55274-640-1011873-23081″
“DigitalProductId”=hex:a4,00,00,00,03,00,00,00,35,35,32,37,34,2d,36,34,30,2d,
31,30,31,31,38,37,33,2d,32,33,30,38,31,00,2e,00,00,00,41,32,32,2d,30,30,30,
30,31,00,00,00,00,00,00,00,86,56,4e,4c,21,1b,2b,6a,a3,78,8e,8f,98,5c,00,00,
00,00,00,00,dd,da,47,41,cc,6b,06,00,00,00,00,00,00,00,00,00,00,00,00,00,00,
00,00,00,00,00,00,00,00,00,00,00,38,31,30,32,36,00,00,00,00,00,00,00,b5,16,
00,00,83,83,1f,38,f8,01,00,00,f5,1c,00,00,00,00,00,00,00,00,00,00,00,00,00,
00,00,00,00,00,00,00,00,00,00,00,00,00,00,00,00,00,66,e5,70,f3
“LicenseInfo”=hex:33,b7,21,c1,e5,e7,cd,4b,fd,7c,c6,35,51,fd,52,57,17,86,3e,18,
d3,f4,8c,8e,35,32,7b,d1,43,8d,61,38,60,a4,ca,55,c9,9a,35,17,46,7a,4f,91,fc,
4a,d9,db,64,5c,c4,e2,0f,34,f3,ea
[HKEY_LOCAL_MACHINESOFTWAREMicrosoftWindows NTCurrentVersionWPAEvents]
“OOBETimer”=hex:ff,d5,71,d6,8b,6a,8d,6f,d5,33,93,fd


Now save this file with .reg extension double click on it, refresh your computer and restart it. You must be done. If anyhow you are not lucky with above trick download any of the following file, double click on it refresh your computer then restart it.

Method:2


Method:3
This will allow you to bypass the Microsoft Genuine Validation thingythis method works better than many others i've tried before.
forget the cracks and injectors etc... this is the BEST WAY:
1) start > run > "regedit" (without the quotes of course)
2) go to the key:HKEY_LOCAL_MACHINE\SOFTWARE\MICROSOFT\Windows NT\CurrentVersion\WPAEvents\OOBETimer...and doubleclick on it.
Then change some of the value data to ANYTHING ELSE...delete some, add some letters, I don't care...just change it!now close out regedit.
3) go to start > run > "%systemroot%\system32\oobe\msoobe.exe /a" (again, dont type the quotes)
4) the activation screen will come up, click on register over telephone, then click on CHANGE PRODUCT KEY, enter in this key: JG28K-H9Q7X-BH6W4-3PDCQ-6XBFJ.
Now you can dl all the updates without activating,
and the Genuine Microsoft Validation thingy won't bug you no more!!
Works with most WinXP versions though ther r some exceptions...

Method:4
If none of above is working for you then visit following link, you will surely get a working key,

Have fun.

Senin, 05 Desember 2011

Windows Media Player 12 for Windows XP

Windows Media Player 12 for Windows XP

Windows Media Player 12 is the latest Media Player offering by Microsoft. The player ships as part of the Windows 7 operating system. Although Microsoft hasn’t officially made this version available for the Windows XP users, there are a couple of tweaks that can make the Media Player 11 work as well as Media Player 12. We will get to that at the end of this article.
windows media player 12


What makes Windows Media Player 12 better?

There is a marked improvement in the user interface. The player is brighter and intuitive. It is also lighter and thus more responsive than the previous versions.
Some of the new features that stand out in the new version are:
  • Completely new library management system that separates the Now Playing and the Library view. This ensures smooth library management and manipulation.
  •  The Now Playing mode consists of the playlist currently being played and videos, visualizations.
  • Support for wider range of formats and playback options. The Media Player 12 recognizes a missing codec, searches and installs them for you automatically.
  • Popular new formats like AAC, H.264 can now be played thanks to the feature mentioned in the previous point.
  • You can browse through your iTunes music library which is a good feature if you have bought songs from the iTunes store.
  • The song preview option is good when browsing for songs. Hover over a particular song and you can listen to a 15 second clip.
Although there are plenty of good features, there are a few features that are still missing and would have come handy.
windows media player 12

Disadvantages of Windows Media Player 12 for Windows XP

  • No native support for FLAC (lossless audio format) files.
  • The visualization option is a little choppy on slower systems.
How can I get the new Windows Media Player 12 for Windows XP?
As mentioned earlier, Microsoft does not provide this version of the player for XP. Nevertheless, you can download this tweaked version created by a DeviantArt use. Since this version is not officially supported, the risk of installing it on a computer is squarely on the user. The player has most features that we talked about in this article. You can download the player here: http://hameddanger.deviantart.com/art/Windows-Media-Player-12-for-XP-182145760.

Minggu, 04 Desember 2011

How to Recover/Hack Windows XP password using Cain & Abel

How to Recover/Hack Windows XP password using Cain & Abel

                    Introduction:-
                                                           Cryptography Decrypted                      
                       In Your Windows XP, 7, VISTA, NT or 2000 system there is a file which store your system password. this file is sam(system account manager) which store all your account information (i.e., user name, password and user setting) and because password can't be saved as it is in a file because it can be hacked easily therefore Windows encrypt this password using a key(this key is stored in System file).
Both System and SAM file is stored at the same location i.e.,
C:\WINDOWS\system32\config
so to recover password we need both these file but because these file are locked so we can not use these file from window so we need other operating system to copy both these files let's say linux(because we can see windows drive in linux so you can go to above location and copy both sam and system file). if you don't have linux it's fine windows store these file in other location also i.e.,
C:\WINDOWS\repair
which Windows does not use so we can copy both files from this directory(but these file are created at the time of disk repair so there are chances that you may not get new password, if you changed your password recently)
How to use "Cain & Abel" To Recover Windows XP Password?
Steps:-
  1. Copy Both System & SAM file from any of the above location.
  2. Download Cain & Abel from here and install it on your System.(antivirus might alert you, but don't worry)
  3. Now open Cain & Abel and go to "Cracker" tab
  4. Now click "+" sign as shown in the figure below.

  5. Now a dialog will appear as shown in the figure above browse to sam file in first field and copy past the hex key by browsing to system file
  6. Now You will see a list of user of the system as shown below.
  7. Suppose among the user in the above list i wanted to recover password of "mac" user name then right click on mac> Brute Force Attack > LM Hashes. now you will see window similar to below image.
  8. Now set your preference in the last window and click start the attack. after it successfully finished performing password recovery it will show you password like in the image below.


    NOTE:-Before beginning to Recover password of Your System. i must clear you that this trick should be used to recover your system's password NOT to Hack Other Persons password because by doing that you could go to prison.

Selasa, 22 November 2011

How To Make Windows Genuine?

Guys anyway to make windows xp professional genuine???
here the procedure to make xp genuine - 110% working

FIRST WAY
ACTIVATE WINDOWS XP WITHOUT REGISTRATION ON INTERNET
1. Type Regedit on the Run Menu

2. Go to Hkey-Local_Machine/Software/ Microsoft/WindowsNT/CurrentVersion/
WPAEvents

3. Select OOBETimer (Reg-Binary) and Press Enter. Now You will See a Set of 12 Keys.

4. FF D5 71 D6 8B 6A 8D 6F D5 33 93 FD
{just delete D6 (4th entry) and replace it with C4}

5. Exit Regedit.

6. Type "%systemroot%\system32\oobe\msoobe.exe /a" on the Run Menu (without quotes)

7. Select "Yes I want to telephone a customer service representative to activate windows".

8. Click Next

9. Select "Change Product Key"

10. Put these keys
QMDGV-QRC2B-XF6JB-GRGHK-W9DRC Or

BHBCB-PTHCD-C7K3K-HFPVC-4BB78

11. Select Update

Don’t worry about asking again to register.

Restart the system and repeat steps 6 to 11, now the process will tell you that Windows XP is already activated.

And Now your Windows Xp is 110% genuine
Enjoy..!!

SECOND WAY
You have a copy of Windows XP which several times pop up message about its activation, you don't have internet connection to activate your XP. So here's the trick that can help you get rid of this problem. Please note that this trick will only work on ordinary Windows XP SP1-SP2 installation that too before installing any other program on it i.e
your installation must be fresh to make this trick work out. Also it will not work on OEM version of Windows XP so if this trick doesn't work for you check your copy for OEM.

Method 1:
Open Notepad and copy following lines in it,


Windows Registry Editor Version 5.00
[HKEY_LOCAL_MACHINESOFTWAREMicrosoftWindows NTCurrentVersion]
“CurrentBuild”=”1.511.1 () (Obsolete data – do not use)”
“ProductId”=”55274-640-1011873-23081″
“DigitalProductId”=hex:a4,00,00,00,03,00,00,00,35,35,32,37,34,2d,36,34,30,2d,
31,30,31,31,38,37,33,2d,32,33,30,38,31,00,2e,00,00,00,41,32,32,2d,30,30,30,
30,31,00,00,00,00,00,00,00,86,56,4e,4c,21,1b,2b,6a,a3,78,8e,8f,98,5c,00,00,
00,00,00,00,dd,da,47,41,cc,6b,06,00,00,00,00,00,00,00,00,00,00,00,00,00,00,
00,00,00,00,00,00,00,00,00,00,00,38,31,30,32,36,00,00,00,00,00,00,00,b5,16,
00,00,83,83,1f,38,f8,01,00,00,f5,1c,00,00,00,00,00,00,00,00,00,00,00,00,00,
00,00,00,00,00,00,00,00,00,00,00,00,00,00,00,00,00,66,e5,70,f3
“LicenseInfo”=hex:33,b7,21,c1,e5,e7,cd,4b,fd,7c,c6,35,51,fd,52,57,17,86,3e,18,
d3,f4,8c,8e,35,32,7b,d1,43,8d,61,38,60,a4,ca,55,c9,9a,35,17,46,7a,4f,91,fc,
4a,d9,db,64,5c,c4,e2,0f,34,f3,ea
[HKEY_LOCAL_MACHINESOFTWAREMicrosoftWindows NTCurrentVersionWPAEvents]
“OOBETimer”=hex:ff,d5,71,d6,8b,6a,8d,6f,d5,33,93,fd


Now save this file with .reg extension double click on it, refresh your computer and restart it. You must be done. If anyhow you are not lucky with above trick download any of the following file, double click on it refresh your computer then restart it.

Method:2

Method:3
If none of above is working for you then visit following link, you will surely get a working key,

Have fun.


Hot Thread Copyright © 2012 Fast Loading -- Powered by Blogger